Friday, September 21, 2007

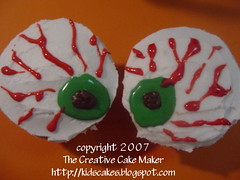
Eyeball Cupcakes


eyeball cupcakes
Originally uploaded by creative cake maker

These cupcakes were made during the same cupcake-a-thon as the previous turtle cupcake. Unfortunately, the kids really thought it was a hoot! They all wanted one. I have three kids...and as you can see, only 2 eyeball cupcakes. More had to be made...soon.

These were pretty easy. I used white for the base, then made the green circle. I left a hole in the circle for the chocolate. I have seen these made elsewhere using lifesavers instead of icing. I think it was in the latest Kraft Food & Family magazine. Then, I used red piping gel to create the "veins". I don't see why the kids got a kick out of eating these...

Turtle Cupcake

Okay, so here's the deal. I made a big batch of cupcakes, and the kids and I started playing with them. We decorated them with all kinds of designs. The icing was piled high (it looked bad but I heard it tasted wonderful) and the kids got to try their hand at piping the icing out of the bag. That's the night the "Mike Wasowski" and "Jack Skellington" cupcakes were created. I was playing around with some leftover icing (there wasn't much) and a blank cupcake and made this turtle.

He wasn't too difficult to make, but I don't think I'd like to make a lot of them at once. It would be WAY too time consuming.


First, I piped the chocolate design on his back. Then I filled in the spaces with dark green piping gel (it can get a bit runny so be careful). Next, I piped on a head, tail and four legs around th eedge of the cupcake. Be sure the icing you use is stiff. The icing we had was store-bought and kept wanting to slide down. Finally, I piped the whites for the turtles eyes and dabbed chocolate dots on them.

He's a bit messy, but kinda cute, too. The kids wanted to eat him before I could take a picture.

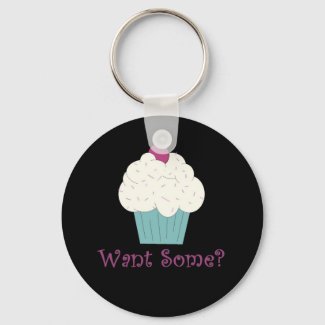
Cupcake Keychain


I recently set up an account with Zazzle.com so I could make cake and cupcake themed items. This is the first of what will hopefully be many. The same cake creativity without all the calories and dishes. This might hold me over til the next birthday...

Monday, September 17, 2007

Where can I get ideas for my cakes?

The answer is ANYWHERE! I know that may not be the answer you wanted, but it's true! You can get ideas anywhere.

Search Online: If you want an easy start, look online. There are many people out there just like me who are showcasing their cake desings in blogs and in online photo galleries. When I wanted to make kitty cat cupcakes, I had a basic idea of what I wanted to do, but I wasn't sure how to go about creating them. So I searched Google for images of "cat cupcakes" and "kitty cupcakes" and any variation of "cat" and "cupcake". I found a lot of ideas from people who had previously made cat cupcakes. I also found images of cats that were simple enough to be made into a stencil/template for my chocolate "kitties" that topped some of the cupcakes.


Books/Magazines: Look in cake decorating books and in magazines. I know Family Fun Magazine has several issues a year with cake ideas. I have also gotten ideas from other decorators and modified their cake designs to fit my own need and my own degree of experience (see Baby Dragon Cake). Debbie Brown makes wonderful sugarpaste creations. I also recently purchased Wilton's Cupcake Fun book which has over 150 ideas for cupcakes and other treats.


Cartoons/Comics: Get your inspiration from familiar characters. I use my children's picture books and DVD covers (see Monster's, Inc cupcakes) for ideas. The model for the Jack Skellington cupcakes came from a poster. Hmmm...Charlie Brown's head would fit perfectly on a cupcake! I'll have to work on that one next...


Check out the world around you: Many times I see a design and think, "Why didn't I think of that?" The answer...because it was so simple. Don't overthink it. At this moment, my daughter is shoving a lollipop in my face trying to get my attention and saying, "Mommy, I'm eating a heart lollipop." There is an idea. A lollipop. A heart lollipop. A kid with a heart lollipop. A princess with a heart shaped wand...


If you let your imagination go with the flow, the ideas present themselves. Just remember to have fun with it.

Monsters, Inc. - Mike Wasowski Cupcakes

I don't know why, but I think it's so cute in the movie, Monster's, Inc. when Boo says, "Mike Wasowski!" And although the connection between Boo and Sully makes a person want to say "aaawwwww", I love the character Mike Wasowski. So in tribute, here are some Mike Wasowski cupcakes.

I came up with the idea for these on the same day I dreamed up Jack Skellington cupcakes. I was sitting at the kitchen table drawing circles on a piece of paper and "designing" cupcakes. I looked to my kids' DVD collection for inspiration. Kids are wonderful that way. If they can recognize a favorite character, the cupcake becomes so much more special to them (and they'll overlook the mistakes).

The Nightmare Before Christmas - Jack Skellington Cupcakes

The last thing I ever thought I'd be making for my 4-year old daughter was Jack Skellington cupcakes. But there I was, at work, dreaming up cupcake ideas. This was during my daughter's 4-month stretch where The Nightmare Before Christmas was her favorite movie ever.

Now, keep in mind, I prefer making cupcakes that ARE something rather than cupcakes with something on top. (For instance, the cupcake is a balloon rather than a cupcake with balloons on top.) So I was thinking, "What is round? I already did a ladybug...Jack's head is round! That would be perfect!"

As soon as I got home, I pulled out some paper and started drawing "cupcake" circles. The first circle was for Jack Skellington. I was pretty happy with the results - especially when my daughter came over to see what I was doing and immediately recognized "Jack". She staked claim on the 1st cupcake I completed.

The hard part was getting the facial features just right. It had to look like "Jack"...not just any ol' skeleton. Once the drawing was done and I had a good idea about the design, I started to make them.

These were very easy to make. The most difficult part was the bat collar (or spider or whatever - my daughter would know). I made that with melted chocolate candy wafers. Melt some wafers til smooth and place in a Ziploc bag. Snip off a tiny bit of the bottom corner and "draw" the collar onto the shiny side of some wax paper. Basically, it is a circle with "wings" coming off it. They don't take long to set, but it's a good idea to do these first.

Ice the cupcakes in white, pipe on the facial features with chocolate icing (because black icing tastes TERRIBLE). I say pipe on the features because it is so much easier than spreading the chocolate around to get the eyes right. If you're making a lot of these, you'll want the simplest way possible.

Add the bat collar to the cupcake (hold it in place with a dab of icing) and you're done! Enjoy!

Sunday, September 9, 2007

Kitty Cat Cupcakes

When my daughter finally decided on "The Cat" for her birthday theme (she loves cats) I immediately thought about the cake. Should it be "Hello Kitty"? or "Tom & Jerry" or her beanie baby kittens? or our kittens? or just any cat? What should it look like? White? Black? Calico?

I decided I couldn't make just one cat cake. Cupcakes would do nicely. So here we are. Lots of kitty cat cupcakes. The main cupcakes have cat faces made out of chocolate candy melts and a few of them are an attempt at making cats entirely out of icing. The latter was dreamed up a few days before the party and a search online for something similar brought on ideas for how to go about making them. I thought the icing cats were a complete disaster but the girls (and my husband) thought they turned out great. In fact, they were the first to disappear!

For the chocolate candy cat faces, I first drew a template of the cat face I wanted - simple enough to do quickly with not a lot of details. I placed the picture underneath a sheet of wax paper. Once I had my chocolate candy wafers melted, I put some in a plastic sandwich bag and traced the outline of the picture. You can see a video tutorial on how to do this. Once the chocolate was cooled and set, I filled in the rest with another color of melted candy wafers. After that hardened, I peeled the cat faces off the wax paper and placed them in the refrigerator until I was ready to assemble the cupcakes.


Once the cupcakes were baked and cooled, I iced a large mound of vanilla icing onto each then sprinkled stars on them. I then placed a kitty face upright in each cupcake.

The icing cats were a bit more difficult, and until I perfect them, I think it's best not to share the technique (seeing as how I don't even HAVE a technique for them yet). Just look at the picture and maybe you can visualize what I was trying to achieve. Or, you can see the ones I was trying to model them after on Cupcake Ninja and ooh and ahhh over those. This creative person did an excellent job! I'll just have to find more cake decorating opportunities so I can practice more!


DISCLOSURE: This blog contains affiliate links. Thank you for supporting The Creative Cake Maker.
Related Posts Plugin for WordPress, Blogger...