Saturday, December 15, 2007

Bowling Themed Cake

I love it (sometimes) when the kids decide what type of cake they want. It forces me to get creative. My son has been saying for months that he wanted a bowling party. I've known for months that he wanted a bowling cake. I was thinking bowling BALL. He was thinking bowling PIN. I found this out the day before I was to make the cake.


I wound up making the ball AND the pin. The cake theme didn't take alot of creativity. I did know I wanted to stay away from a black bowling ball. After the grill cake, I knew I didn't want to offer black icing to everyone. The creativity came about when I realized I was going to have to drive across town with the cake to the bowling alley where we were having this party...

I had originally thought about making a dome ball until my son informed me he wanted a bowling PIN. Then I shifted to an oversized bowling pin. I could make a 13x9 cake, cut it lengthwise and set the short ends together. But how would I transport it?


I could make a double decker bowling pin cake and carve it into something 3-D. I thought it might look a bit odd. I decided to make a single layer cake. It could then be easily transported in my Wilton Ultimate 3-in-1 Cupcake Caddy (with the cupcake insert removed).

From a 13x9 cake, I cut out a bowling pin shape. The kids munched on the rest. I also made two 9" round cakes. One layer went into the freezer for another cake. The other was trimmed to fit next to the bowling pin so I appeared to look like a bowling ball slightly behind the bowling pin.

The pin was iced with white canned icing. I reserved a little white from that can to color red for the stripes. I colored 1/2 can of icing purple and the other 1/2 can blue. I put both colors into a decorating bag and covered the cake. Then I gently smoothed the icing over the cake to create a slightly marbled effect. The leftover marbled icing was used to do the writing. If anyone can think of some better bowling birthday verses, let me know. My teenager decided he wanted to do the Extreme bowling party in March (when the bowling alley turns out the lights and the laser lights come on).

Monday, December 10, 2007

Cookie Christmas Tree

Recently, one of my co-workers saw this blog and decided I could definitely contribute to this years company Christmas Party.

On one of her shopping excursions, she found a "Cookie Tree Kit" produced by Wilton. It was a set of 10 plastic star-shaped cookie cutters in graduated sizes from small to large, along with two decorating tips, 2 plastic piping bags and a booklet of recipes and instructions for each of the trees pictured on the package. I had never seen this kit (which surprised me because I am a frequent visitor to the Wilton website) and was certainly up for the challenge.
The kit had several design ideas on the package and my co-worker had already picked out the design she wanted. I was told to make it blue, white and silver (or any combination of the three colors) so the tree would coordinate with the decorations.

I knew just by looking at the picture that I would need to make this tree in stages. Baking, icing, stacking and icing again. This was fine because my regular work day begins at 7:30 am and ends at 7 pm. That doesn't leave a lot of time to play around in the kitchen.

The party was to be held on Saturday evening. The Monday before the party, I pulled out the Cookie Tree Kit and read over everything. When you are told to read over all the instructions carefully, it's for a reason. I should have read over the instructions twice.

The booklet contains 2 recipes for the Cookie Tree. One for sugar cookies and the other for gingerbread cookies. I needed sugar cookies for the tree I was to make. It turns out you need to make 2 batches of the sugar cookie recipe to make one tree (the same thing goes for the gingerbread cookie recipe if you plan to make that one). This would normally not be a problem, but, as I stated earlier, this was Monday. My husband had just come back from the grocery store, it was 9 o'clock at night and I realized I needed another 2 sticks of butter to even begin making the cookies!

I didn't get started on this project until Wednesday night and it took a combined total of 6 hours to complete (not including cooling and drying time). This is definitely not a last minute project. You could, however, try making the gelatin tree or crisped rice tree in less time. Instructions for these two items are also included in the kit.

I made the blue icing a poured it over the cookies. It dried with a nice shiny coating. I then piped each cookie with a white criss-cross star and stacked them on top of each other. You need to be sure the cookies are evenly stacked to keep the tree from toppling over. I placed a dab of icing in the center of each cookie to act as "glue" for the one above it.


To finish, I used a star decorating tip to pipe "snow" on the tips of each cookie. The I placed a silver dragee on the top of the "snow".


A simple silver bow with ribbon curling down finished the tree.


It was beautiful! It took awhile for people to start eating the cookie tree, but when we finally did, it tasted great, too!

Thursday, November 22, 2007

A Change Of Pace

Double Chocolate Pumpkin CheesecakeOnce in awhile I do make a dessert that is not covered in icing. I love baking so cookies, muffins, pies, etc all come out of my kitchen. I've already been asked if I was going to make buckeyes this Christmas. They are the peanut butter balls coated in chocolate and look like buckeyes. If you've never had one, try one. They're excellent!

This particular dessert was made for Thanksgiving. It is a double chocolate pumpkin cheesecake. I'm posting it because people thought I just bought the darn thing. That's funny. My husband, while we were shopping for the cheesecakes ingredients, said, "Mrs. Smith's pies are buy-one-get-one-free. Why don't you just get that for Thanksgiving?" I just shot him a look. I don't buy food for thanksgiving. I make food for Thanksgiving. Well, except for the jellied cranberry sauce. I LOVE that stuff!

Monday, October 1, 2007

Unusual Halloween Cupcake Design Ideas

Halloween is almost here! Gear up for the holiday this month by whipping up a batch or two of Halloween themed cupcakes! Take them to work or send them to school with the kids. You won’t get too many people turning you down!

Usually, when it comes to making cupcakes, once the icing is on, many people have trouble coming up with ideas for decorating them. They wind up with a few colored sprinkles or pre-made themed candies.

While I wouldn’t turn down a cupcake of any kind (as long as it wasn’t truly revolting), there are many wonderful cupcake decorating ideas out there to try this Halloween. Lots of ghosts, candy pumpkins on top of mounds of icing, the usual black cat or spooky black blob of a spider are the mainstream of what you’ll find searching the web. However, this collection of ideas showcases the unusual and/or “too cute to pass by” cupcakes. They had some thought put into them. They are fairly original. Each of the following links will take you to the image and the recipe or directions for how to create the cupcake.

The Gross and the Scary

The following might have youngsters squealing “eeewww” until they realize they are staring at a sugary concoction:

For starters, try these “Brain Cupcakes” from for a gory treat.

What could be spookier than “Eyeball Cupcakes” staring at you? ? Here is another “Eyeball Cupcake” version.

Older goblins might enjoy these “Skull Cupcakes” more than smaller trick-or-treaters.

These “Werewolf Cupcakes” may be scary for the little ones, but the older kids will love them.

You’ll need to scroll down a bit for these “Revolting Rodent Cupcakes”, but you’ll also find many other Halloween delicacies to create for your party.

While the vampire has long been a staple of Halloween, these Vampire Cupcakes are new on the scene. Some may think he belongs in the Cute Cupcake section below, but this one was a bit too pale and icky for my taste.

The Cute

The following cupcakes are definitely for the younger crowd – although I certainly enjoy these cute cupcakes, too.

How about scaring up a batch of “Mini Monster Cupcakes” – sure to bring a smile.

While you’re thinking about monsters, try these “Sweet Monster Cupcakes” to delight your own sweet monsters.

Kids will love this Mummy Cupcake for Halloween! Or, if you want a bigger mummy, try these Yummy Mummy Cupcakes.

These Goofy Goblin Cupcakes are really cute!

These creatures are definitely not my favorite when found in the backyard. But when sitting on a plate like this Bat on the top of a cupcake, I can’t help but smile.

These Spider Cupcakes couldn’t be passed by. It’s the eyes that got me.

These ideas should be enough to get you started. And remember, they are only ideas. Don’t worry about making them look just like the pictures. Use what you have on hand. Create your own ideas or just modify these. Even if you really make a mess of them, they'll look perfect for Halloween!
Picture, by earl53, obtained from Morguefile.com

Friday, September 21, 2007

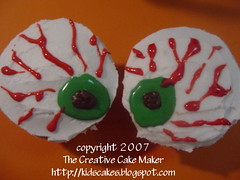
Eyeball Cupcakes


eyeball cupcakes
Originally uploaded by creative cake maker

These cupcakes were made during the same cupcake-a-thon as the previous turtle cupcake. Unfortunately, the kids really thought it was a hoot! They all wanted one. I have three kids...and as you can see, only 2 eyeball cupcakes. More had to be made...soon.

These were pretty easy. I used white for the base, then made the green circle. I left a hole in the circle for the chocolate. I have seen these made elsewhere using lifesavers instead of icing. I think it was in the latest Kraft Food & Family magazine. Then, I used red piping gel to create the "veins". I don't see why the kids got a kick out of eating these...

Turtle Cupcake

Okay, so here's the deal. I made a big batch of cupcakes, and the kids and I started playing with them. We decorated them with all kinds of designs. The icing was piled high (it looked bad but I heard it tasted wonderful) and the kids got to try their hand at piping the icing out of the bag. That's the night the "Mike Wasowski" and "Jack Skellington" cupcakes were created. I was playing around with some leftover icing (there wasn't much) and a blank cupcake and made this turtle.

He wasn't too difficult to make, but I don't think I'd like to make a lot of them at once. It would be WAY too time consuming.


First, I piped the chocolate design on his back. Then I filled in the spaces with dark green piping gel (it can get a bit runny so be careful). Next, I piped on a head, tail and four legs around th eedge of the cupcake. Be sure the icing you use is stiff. The icing we had was store-bought and kept wanting to slide down. Finally, I piped the whites for the turtles eyes and dabbed chocolate dots on them.

He's a bit messy, but kinda cute, too. The kids wanted to eat him before I could take a picture.

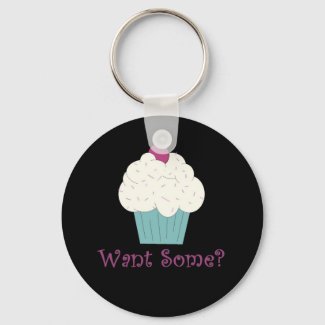
Cupcake Keychain


I recently set up an account with Zazzle.com so I could make cake and cupcake themed items. This is the first of what will hopefully be many. The same cake creativity without all the calories and dishes. This might hold me over til the next birthday...

Monday, September 17, 2007

Where can I get ideas for my cakes?

The answer is ANYWHERE! I know that may not be the answer you wanted, but it's true! You can get ideas anywhere.

Search Online: If you want an easy start, look online. There are many people out there just like me who are showcasing their cake desings in blogs and in online photo galleries. When I wanted to make kitty cat cupcakes, I had a basic idea of what I wanted to do, but I wasn't sure how to go about creating them. So I searched Google for images of "cat cupcakes" and "kitty cupcakes" and any variation of "cat" and "cupcake". I found a lot of ideas from people who had previously made cat cupcakes. I also found images of cats that were simple enough to be made into a stencil/template for my chocolate "kitties" that topped some of the cupcakes.


Books/Magazines: Look in cake decorating books and in magazines. I know Family Fun Magazine has several issues a year with cake ideas. I have also gotten ideas from other decorators and modified their cake designs to fit my own need and my own degree of experience (see Baby Dragon Cake). Debbie Brown makes wonderful sugarpaste creations. I also recently purchased Wilton's Cupcake Fun book which has over 150 ideas for cupcakes and other treats.


Cartoons/Comics: Get your inspiration from familiar characters. I use my children's picture books and DVD covers (see Monster's, Inc cupcakes) for ideas. The model for the Jack Skellington cupcakes came from a poster. Hmmm...Charlie Brown's head would fit perfectly on a cupcake! I'll have to work on that one next...


Check out the world around you: Many times I see a design and think, "Why didn't I think of that?" The answer...because it was so simple. Don't overthink it. At this moment, my daughter is shoving a lollipop in my face trying to get my attention and saying, "Mommy, I'm eating a heart lollipop." There is an idea. A lollipop. A heart lollipop. A kid with a heart lollipop. A princess with a heart shaped wand...


If you let your imagination go with the flow, the ideas present themselves. Just remember to have fun with it.

Monsters, Inc. - Mike Wasowski Cupcakes

I don't know why, but I think it's so cute in the movie, Monster's, Inc. when Boo says, "Mike Wasowski!" And although the connection between Boo and Sully makes a person want to say "aaawwwww", I love the character Mike Wasowski. So in tribute, here are some Mike Wasowski cupcakes.

I came up with the idea for these on the same day I dreamed up Jack Skellington cupcakes. I was sitting at the kitchen table drawing circles on a piece of paper and "designing" cupcakes. I looked to my kids' DVD collection for inspiration. Kids are wonderful that way. If they can recognize a favorite character, the cupcake becomes so much more special to them (and they'll overlook the mistakes).

The Nightmare Before Christmas - Jack Skellington Cupcakes

The last thing I ever thought I'd be making for my 4-year old daughter was Jack Skellington cupcakes. But there I was, at work, dreaming up cupcake ideas. This was during my daughter's 4-month stretch where The Nightmare Before Christmas was her favorite movie ever.

Now, keep in mind, I prefer making cupcakes that ARE something rather than cupcakes with something on top. (For instance, the cupcake is a balloon rather than a cupcake with balloons on top.) So I was thinking, "What is round? I already did a ladybug...Jack's head is round! That would be perfect!"

As soon as I got home, I pulled out some paper and started drawing "cupcake" circles. The first circle was for Jack Skellington. I was pretty happy with the results - especially when my daughter came over to see what I was doing and immediately recognized "Jack". She staked claim on the 1st cupcake I completed.

The hard part was getting the facial features just right. It had to look like "Jack"...not just any ol' skeleton. Once the drawing was done and I had a good idea about the design, I started to make them.

These were very easy to make. The most difficult part was the bat collar (or spider or whatever - my daughter would know). I made that with melted chocolate candy wafers. Melt some wafers til smooth and place in a Ziploc bag. Snip off a tiny bit of the bottom corner and "draw" the collar onto the shiny side of some wax paper. Basically, it is a circle with "wings" coming off it. They don't take long to set, but it's a good idea to do these first.

Ice the cupcakes in white, pipe on the facial features with chocolate icing (because black icing tastes TERRIBLE). I say pipe on the features because it is so much easier than spreading the chocolate around to get the eyes right. If you're making a lot of these, you'll want the simplest way possible.

Add the bat collar to the cupcake (hold it in place with a dab of icing) and you're done! Enjoy!

Sunday, September 9, 2007

Kitty Cat Cupcakes

When my daughter finally decided on "The Cat" for her birthday theme (she loves cats) I immediately thought about the cake. Should it be "Hello Kitty"? or "Tom & Jerry" or her beanie baby kittens? or our kittens? or just any cat? What should it look like? White? Black? Calico?

I decided I couldn't make just one cat cake. Cupcakes would do nicely. So here we are. Lots of kitty cat cupcakes. The main cupcakes have cat faces made out of chocolate candy melts and a few of them are an attempt at making cats entirely out of icing. The latter was dreamed up a few days before the party and a search online for something similar brought on ideas for how to go about making them. I thought the icing cats were a complete disaster but the girls (and my husband) thought they turned out great. In fact, they were the first to disappear!

For the chocolate candy cat faces, I first drew a template of the cat face I wanted - simple enough to do quickly with not a lot of details. I placed the picture underneath a sheet of wax paper. Once I had my chocolate candy wafers melted, I put some in a plastic sandwich bag and traced the outline of the picture. You can see a video tutorial on how to do this. Once the chocolate was cooled and set, I filled in the rest with another color of melted candy wafers. After that hardened, I peeled the cat faces off the wax paper and placed them in the refrigerator until I was ready to assemble the cupcakes.


Once the cupcakes were baked and cooled, I iced a large mound of vanilla icing onto each then sprinkled stars on them. I then placed a kitty face upright in each cupcake.

The icing cats were a bit more difficult, and until I perfect them, I think it's best not to share the technique (seeing as how I don't even HAVE a technique for them yet). Just look at the picture and maybe you can visualize what I was trying to achieve. Or, you can see the ones I was trying to model them after on Cupcake Ninja and ooh and ahhh over those. This creative person did an excellent job! I'll just have to find more cake decorating opportunities so I can practice more!


Saturday, June 30, 2007

"Prancing Pony" Cake

My niece loves horses and ponies. She collected "My Little Pony" almost as long as my son collected "Power Rangers" (not that he would admit it now days). So, of course, when her birthday came along, I suggested a horse for her cake. She loved it! Especially the mane which is nothing but icing. I was pleased with the results, but felt the muzzle could have been a bit longer.

I had originally planned to post instructions for this cake here but decided against it. Instead, if you want a pony, horse or unicorn cake, see the Unicorn Cake


If you still want to make this cake, I suggest improving it by finding a medium sized mixing bowl and a small mixing bowl. Turn them both upside down empty, put them together and see if the sizes will work for your cake. Meaning, can you see it as a horse?


In this case, the larger bowl was much too large for the smaller bowl. Perhaps if I had made 2 smaller bowl cakes to go with the one large cake and extended the muzzle out farther instead of just making it bigger...


Hmmm...I may have to revisit this cake...

Wednesday, June 20, 2007

Movie Script Cake

My husband, better known as "Dada" by the kids, has another love in his life. Sigh. His other love is writing. Screenwriting, to be specific. What better way to celebrate his birthday than to have a cake shaped like one of his movie scripts.
He was quite pleased with this script...err...this cake. I was quite disappointed...in the cake...not the script. The icing kept wanting to dry before I could get it smooth enough so I spent a LOT of time fussing over it. It still had ridges in it. I would have preferred the cake having corners that were more squared, but the pan had rounded corners. My husband always tells me I am my worst critic - especially when it comes to my cakes - so I figure, even if I don't like it but I can still live with it, everything is fine. Otherwise, the cake itself is very easy to make.

The script cake is a simple 9x13 cake leveled off on top and iced white. The sides have markings to resemble "pages" of the script. The "text" is simple black decorator gel. If you plan on making this, I would recommend skipping the decorator gel. Use black colored icing instead. Gel can get runny. Icing probably wouldn't. Lastly, I placed real (clean) brads along the edge.

I think my main problem with it is the absence of color. That's why I had the shiny foil and bright yellow star cut-outs under the cake. It cake it more of a "Hollywood" feel.

Oh, and FYI, a script is only supposed to have 2 brads in it...not three. A major faux pas, I hear.

Tia had fun with the stars, though...

Thursday, May 17, 2007

Review of "Wilton" Silicone Baking Cups

I love baking cupcakes, even more than baking them, I love decorating them. Even more than me decorating them, my kids love to eat them. They oooh and aaah over the cupcakes. They pick out the biggest and best looking one they can find. Then they smash it into their mouths and smear all that pretty icing. They love to eat cupcakes.

Because I make a lot of cupcakes, I need a lot of cupcake liners. I usually have a couple containers of the paper ones hanging around the kitchen. Recently, I ran across a sale at AC Moore (the local craft store chain in this area). The Wilton brand silicone baking cups were half off. Of course, I didn't hesitate to buy them. Reusable baking cups? I could save a fortune by not having to buy the paper ones anymore.

Wilton's online store has this to say about them:
"Discover the convenience and easy release of flexible silicone bakeware!
Exceptional baking performance for your favorite recipes
Freezer, refrigerator, oven, microwave and dishwasher safe
Resists stains and odors
Oven safe to 500°F
Easy and convenient storage
Limited lifetime warranty No muffin pan needed! Bake and serve in these reusable oven-safe cups."


Wow! And only $9.99 for a set of 12. $4.99 on sale. Well, a part of my brain still said, "yikes - that's a lot for muffin cups." But they were reusable and they were on sale. So I bought them.

I tried these out the first chance I got. I could put the cups in a muffin pan, or, I could just place the cups on a regular cookie sheet and fill them. I chose to put them in a muffin pan. I wasn't going to take any chances and wind up with batter all over the bottom of my oven. I did spray them a bit with some cooking spray because I read on another brand of silicone bakeware, "for best results, coat lightly with cooking spray".

The cupcakes baked beautifully! And the silicone cups can be coordinated to match your decorating scheme. However, although the kids (at this time, ages 3 and 7) liked trying something new, especially with a cupcake in it, they soon tired of it. They had a difficult time removing the cupcakes from the cup without making a mess. The silicone cups were not flexible enough. The paper liners are much easier for them to handle.

Would I recomend them? Yes...unless you're making cupcakes for the kids. For a cupcake alternative, I have a silicone muffin pan than I put cupcake liners in when making cupcakes - it works great with muffins!

So why buy the individual liners in the first place? Well, Wilton has several alternatives - all of which I need to find time to do.

One idea is to make gelatin in them. Lightly spray the mold with oil and pour your gelatin in it. When the gelatin has set, unmold, set on a plate and "ice" the gelatin cupcake with whipped cream. Add sprinkles and/or a cherry on top for a cool summer treat!

Another idea is to melt down some candy melts and generously brush the melted candy all over the bottom and up the sides of the mold. Once the candy hardens, gently unmold the candy shell and fill with whipped cream, fruit, chocolate mousse, or any number of things!

Book: Wallace and Gromit Cracking Celebration Cakes

Although I don't currently use fondant/sugarpaste for my cakes, I love to look through cake books by Debbie Brown. Her cakes provide some wonderful inspiration for my own creations (as seen with my Baby Dragon cake). I recently visited her website to see a list of her publications and came across a new book, Wallace and Gromit Cracking Celebration Cakes: Over 20 Cake Projects for Special Occasions (Hardcover).

As a huge Wallace & Gromit fan, and an amateur cake decorator, I had to get this book. It was just one of those "Gotta Have It" moments that wouldn't stop. My kids, who also love the Wallace & Gromit short films, couldn't believe they could actually have a Gromit cake! Unfortunately, this title was very difficult to find in the US, so I ordered it from England. (Update 4/02/2014: Now you can purchase it at Barnes & Noble)

It is a wonderful collection of Wallace & Gromit themed cakes! There are several for the beginner and others for the more experienced (such as the cake pictured on the cover). And there are plenty of detailed instructions and color photos to assist you through the decorating process. There are also simple fairy/cup cakes and mini cakes. You'll find cakes from all the Wallace & Gromit short films as well as from the recently released "Curse of the Wererabbit".

I have yet to make one of the "Cracking Good" cakes, but in the meantime, it is definately a fun cake book to look through. Watch out, though...if you are a Wallace and Gromit fan/cake decorator like me, this is one book that may cause you to have a "gotta have it" moment, too.

Saturday, March 24, 2007

Baby Dragon Cake


After my previous Dragon Cake, my oldest son decided HE wanted a dragon cake as well. I looked through all sorts of design books and one day my son came up to me with a design by Debbie Brown in her Magical Cakes book. That was the inspiration for this baby dragon cake.


The main difference between the two is the lack (actually a complete absence) of fondant (sugarpaste) in my cake, but you can definately see the similarities.

This cake was made with a box of cake mix, buttercream icing, Wilton Candy Melts, Candy Clay, a marshmallow (large) and some black gel decorator's icing. The marshmallow was trimmed down a bit, so what you see as the eyes is really one piece of marshmallow.

My son wanted his dragon to be blue, so I colored it with a cornflower blue gel.

Sunday, March 18, 2007

Dad's Cookout (Grill Cake)

Once again, the cake making opportunity strikes. I should call this cake "Grandpop's Cookout" since it was for my father-in-law and 9 times out of ten, during the summer months, he's grilling dinner. But, this idea came straight from Wilton.com, so I am keeping their name on it and including the link to the recipe and assembly instructions (it seems they have since removed the tutorial but here is a link to a similar "grill cake"). Whatever you do, please do not compare my version to theirs. I AM still an amateur decorator. And I AM proud of my cake - even though it started to drive me nuts around 9pm the night before the party...


I used buttercream icing on the entire cake and a cake recipe I got from my old 1967 copy of The Joy of Cooking (which, by the way, was a GREAT recipe but unfortunately, I don't remember which one it was). I have also decided that I dislike black icing almost as much as red.


The burgers and hot dogs are made out of Wilton Candy Clay. The hot dogs were hand molded and the burger patties are formed using a heavily scrubbed Playdoh mold. The cheese slices are just melted candy melts spread on the burger patties.

Tristan loved this cake because he thought the "flames" were actually grilled shrimp - and he loves his shrimp!

I didn't actually get to go to my father-in-law's birthday party (had to work) so Will got to drive the cake to their house and worry about having the cake slide around the floorboard of the car the whole way there (in it's carrying container, of course). I heard it arrived just fine and everyone loved it.

Wednesday, March 14, 2007

Bumblebee Cupcakes

Nothing could be cuter than a swarm of bumblebee cupcakes at your party! These cupcakes are quick and easy. They don’t take much more than a box of cake mix, some colored icing and marshmallows. If you want to add the wings, you’ll need some vanilla candy wafers or some white chocolate to melt down.

Ingredients:

1 standard box of cake mix (whatever flavor you prefer), baked in 48 cupcake liners and cooled. If you need assistance in baking and cooling your cake, please refer to these video tutorials on “How To Bake A Cake”.
How To Bake A Cake (Part 1): Preparing Your Baking Pans
How To Bake A Cake (Part 2): Mixing & Baking Your Cake
How To Bake A Cake (Part 3): Testing, Removing and Cooling Your Cake
Yellow gel coloring or food coloring
1 container of chocolate icing
(or black colored icing)
1 container of vanilla/white icing, colored yellow using the yellow coloring
48 miniature marshmallows
– each one cut in half
Vanilla flavored Candy Wafers or White Chocolate (optional if you want to add wings)

Tools:


3 sandwich sized zipper sealed bags
Spoon
Scissors
Wax Paper -
(if making wings)
Microwave-safe bowl or Double Boiler - (if making wings)

If you have not already done so, bake your cupcakes according to package directions and cool completely. If they not cooled, your icing will start to melt and slide off the cupcakes.


First, fill one Ziploc sandwich bag (or similar brand) 1/3 full with some chocolate icing. Push the icing toward one of the bottom corners of the bag. Snip a small hole in the corner of the bag with your scissors. Twist the excess bag to create a decorating “piping bag”. Place the “twist” in the joint between your thumb and the rest of your hand. Close your hand over the rest of the bag. View a video tutorial for this step if you are unsure how it should be done. To decorate your cake, you will squeeze the bag. Try it a little on some wax paper to get used to it.

Now, following the design on the picture, “pipe” an outline for the head of the bumblebee. Fill in the head with chocolate icing. Leave a small space and pipe another 2 rows of chocolate icing. Leave a second space and pipe the rest of the way to the edge of the cake with chocolate icing.
Now, fill a sandwich bag 1/3 full with yellow icing. Just as you did with the chocolate icing, push the icing toward one corner and cut a hole in the corner. Fill in all the areas of the cupcake between the chocolate that still have cake exposed.

For the eyes, place 2 halves of a miniature marshmallow close together at the front of the cake on the chocolate “head”. Then, pipe chocolate "eyes" onto the marshmallows.

For the wings (optional), melt down your candy wafers or your white chocolate. This can be done in a double boiler or in a microwave. Place the melted chocolate in a sandwich bag and snip off a tiny hole in the bottom corner. Using the melted white chocolate, “draw or outline” pairs of wings (separately) on a piece of wax paper. They should look like the letter “B” or a sideways “heart”. Do not fill in the wings as this will make the wings very heavy. A simple outline of wings will do.

Allow the wings to cool and harden. Gently remove them from the wax paper and place upright in your cupcakes.

With the wings done, your cupcakes are finished!

Bumblebee Cake

After making the ladybug cake, I had to keep going. But, there is only so much cake this family can safely eat without developing eating disorders or high-tailing it off to Weight Watchers...so I had to wait.
Even though we have 4 March birthdays to celebrate in this family, I couldn't wait much longer to make another fast and easy round googly eyed cake like the ladybug...

Introducing the Bumblebee...instructions coming soon...

Wednesday, February 28, 2007

Dragon Cake

I have to give credit for this idea to "The Children's Party Handbook" by Alison Boteler. This was a fun cake to make. It was made from two 8" round cakes. Had I followed my own rules, using store bought cake mix and icing, it would have been easier. But, this cake was for my best friend who wanted buttercream icing. It's thicker and harder to spread than store-bought canned icing. And since buttercream icing is too sweet for a box cake mix like my beloved Pillsbury, I made the cake from scratch. Ahh, the things I do because I love my friends. She DID help me ice it. And then swore she would never request a dragon cake again. Details for this cake are coming soon, but for now, I leave you with the gargantuan picture (the dragon measured a good two feet across!)

Saturday, January 27, 2007

Ladybug Cake

This adorable cake kept me in giggles. Every time I'd look at it, and at it's counterparts, the ladybug cupcakes, I couldn't help but to smile. One of my nieces got this cake for her 3rd birthday.

It was very easy to decorate and it didn't take much more than a box of cake mix, some colored icing and a marshmallow.

As you can see, I didn't use red icing. The darker red the icing got, the more bitter the taste became. So I stopped at a more "deep pink" color. I also used chocolate icing instead of black. It seemed to go well with the pink color anyway.

Ingredients:
1 standard box of cake mix (whatever flavor you prefer), baked and cooled. You will only need one round layer for this cake so I usually make 12 cupcakes with the extra cake mix.
Red gel coloring or food coloring - I recommend using Wilton no-taste red icing gel coloring. The gel coloring is more concentrated so you get a deeper hue without using all your coloring. The red color also tends to be bitter so the no-taste red helps to combat that.
1 container of chocolate icing (or black colored icing)
1 container of vanilla/white icing, colored red using the red coloring
1 large marshmallow
1 red Twizzler – optional for antennae
2 miniature marshmallows – optional for antennae

Tools:
2 sandwich sized zipper sealed bags
Scissors
Knife (if making antennae)
Sharp pointed knife or a chopstick (if making antennae)
Large plate, cake stand, or cake board for displaying your finished cake
If you have not already done so, bake your round layer cake according to package directions and cool it completely. If it is not cooled, your icing will start to melt and slide off the cake.
Place your cake right side up on the plate you will display it on. If you prefer, you can place your cake on a cake board and move it to it’s permanent home once it is completed. However, most of us don’t have cake boards handy. The cake pictured here is resting on a paper plate.


First, fill one Ziploc sandwich bag (or similar brand) 1/3 full with some chocolate icing. Push the icing toward one of the bottom corners of the bag. Snip a small hole in the corner of the bag with your scissors. Twist the excess bag to create a decorating “piping bag”. Place the “twist” in the joint between your thumb and the rest of your hand. Close your hand over the rest of the bag. To decorate your cake, you will squeeze the bag. Try it a little on some wax paper to get used to it.

Now, “pipe” an outline for the head and under-body parts of the ladybug. These are the areas you would normally color black on a ladybug. Next, fill in the areas. I filled in the head area with swirls and the back area with lines.

Then, Fill a Ziploc bag 1/3 full with red icing. Just as you did with the chocolate icing, push the icing toward one corner and cut a hole in the corner. This time, cut a larger hole. Make little “blobs” of red icing – about dime sized – all over the remainder of the cake. You could simply smooth on the red with a spatula, but I feel it is easier and less messy for me to pipe it onto the cake.

Once the red area is done, pick up your chocolate icing bag again and pipe spiraled circles onto the back of the ladybug. They don't have to be symmetrical and there doesn’t need to be a lot. Six 1-inch circles should be plenty.

For the eyes, cut the ends off a large marshmallow and press them close together at the front of the cake on the chocolate “head”. Then, pipe chocolate "eyes" onto the marshmallows. Suddenly, with the eyes done, the cake becomes a giggle grabber.


For the antennae (optional), cut strips out of a length of a red Twizzler and push one end of each down into the cake just above the eyes. I cut a 3 or 4 inch length off and cut it into 4 strips, using only 2 for the cake. On the exposed end of each, I attach a miniature marshmallow. It's easier if you make a hole in the miniature marshmallow first with a knife, then push it onto the Twizzler piece.

With the antennae done, your cake is finished! You can put candles in the cake and enjoy!

Ladybug Cupcakes

Imagine the smiles you'll see when you serve these at your next party! These ladybug cupcakes are quick and easy. They don't take much more than a box of cake mix, some colored icing and marshmallows. And, as an added bonus, they are perfect for the beginning cake decorator.

Ingredients:
1 standard box of cake mix (whatever flavor you prefer) baked in 24 cupcake liners and cooled. If you need assistance in baking and cooling your cake, please refer to these video tutorials on "How To Bake A Cake".
How To Bake A Cake (Part 1): Preparing Your Baking Pans
How To Bake A Cake (Part 2): Mixing & Baking Your Cake
How To Bake A Cake (Part 3): Testing, Removing and Cooling Your Cake
1 container of chocolate icing
1 container of vanilla/white icingRed gel coloring or food coloring - I recommend using Wilton no-taste red icing gel coloring. The gel coloring is more concentrated so you get a deeper hue without using all the coloring. The red color also tends to be bitter so the no-taste red helps to combat that.
24 miniature marshmallows - each one cut in half to make 24 pairs of "eyes"

Tools:
2 sandwich sized zipper sealed bags
Spoon
Scissors

If you have not already done so, bake your cupcakes according to package directions and cool completely. If they not cooled, your icing will start to melt and slide off the cupcakes.

First, fill one sandwich bag 1/3 full with some chocolate icing. Push the icing toward one of the bottom corners of the bag. Snip a small hole in the corner of the bag with your scissors. Twist the excess bag to create a decorating "piping bag". Place the "twist" in the joint between your thumb and the rest of your hand. Close your hand over the rest of the bag. View a video tutorial for this step if you are unsure how it should be done. To decorate your cupcake, you will squeeze the bag. Try it a little on some wax paper to get used to it.

Now, following the picture, "pipe" the outlines for the ladybug. Fill in the head and tail areas with chocolate icing.

Next, color your white/vanilla icing red using the food coloring or no-taste red gel coloring. Let the icing sit for a bit to allow the color to deepen. Fill a sandwich bag 1/3 full with red icing. Just as you did with the chocolate icing, push the icing toward one corner and cut a hole in the tip of the corner. Fill in all the remaining areas of the cupcake.

For the eyes, place 2 halves of a miniature marshmallow close together at the front of the cake on the chocolate "head". Then, pipe chocolate "eyes" onto the marshmallows.

With the eyes completed, your cupcakes are finished!

Wednesday, January 24, 2007

Butterfly Cake and Flower Cupcakes

I have to give credit for this Butterfly Cake to Birthday Express. I found out the day before that I needed a cake for my niece's birthday party (we were trying to coordinate schedules). I am the cake lady so, naturally, I volunteered to make the cake. Especially since it was mentioned we could always BUY a cake. I couldn't allow THAT. I was looking for ideas for a simple cake. One I could bake, cool, and decorate in about 2 hours. This one looked like it fit the bill. It only uses one 8" or 9" round cake pan, so I used the rest of the cake batter and icing to make the Flower Cupcakes. I added Wilton Color Gel (Sky Blue and Christmas Red) to make the purple icing. It actually had a satiny sheen to it.


DISCLOSURE: This blog contains affiliate links. Thank you for supporting The Creative Cake Maker.
Related Posts Plugin for WordPress, Blogger...